
A new leather holster should feel snug, a bit stiff, and very secure. That is by design. I have broken in dozens over the years, and the best results come from slow, safe steps. In this guide, I will show you how to break in a new leather holster the right way. We will keep the fit tight, protect the leather, and avoid damage. If you want a smooth draw and solid retention, this is for you.
Why Break-In Matters And What To Expect
A new leather holster is cut to be tight. Leather molds to your firearm over time. That is what gives you secure retention and a clean draw. Early on, you may feel drag, squeak, or a sticky re-holster.
Expect a short break-in period of a few days of light, dry practice. Good break-in keeps edges sharp, trigger covered, and retention safe. Poor break-in can loosen fit too much or crack the leather.
Think of it like a new pair of boots. You would not soak them. You would not bake them. You would wear them in with care and short sessions. Do the same here.

Safety First: Prepare Your Holster And Firearm
Always clear your firearm before any holster work. Check the chamber, magazine well, and verify again. Work in a safe area with no ammo nearby.
Inspect the holster. Look for rough edges, loose stitches, or tight spots. Note the sweat guard, sight channel, trigger coverage, and belt loop fit. Read the maker’s instructions. Many brands share exact steps and care notes.
Wear a sturdy belt if you plan to test draw. A solid belt improves retention and forms the holster to your body. Keep sessions short to avoid over-stretching the leather.
The Right Way: Step-By-Step Break-In Process
Use this simple process. It keeps the holster tight yet smooth.
- Wrap method for gentle fit: Unload the firearm. Place one layer of thin, smooth paper or a plastic bag over the slide and frame. Avoid the trigger area. Insert and remove the wrapped gun 10 to 15 times with steady pressure.
- Seat and set: Insert the wrapped gun and let it sit in the holster for 15 to 30 minutes. This lets leather fibers relax a touch.
- Draw practice: Remove wrap. Do 25 to 50 slow draws with the empty firearm. Re-holster with the muzzle guided and the trigger covered. Focus on straight-line movement.
- Micro-stretch tight spots: If the front sight channel or ejection port feels sticky, press the leather from the outside with your thumb. Small, even pressure helps without over-stretching.
- Daily carry cycles: Wear the holster around the house for 30 to 60 minutes. Make a few slow draws in a safe direction. Repeat for two to three days.
From my experience, this routine creates a smooth, safe fit without killing retention. It also protects the finish and keeps edges crisp.
Speed Up Fit Without Damaging Leather
You can speed the process, but do not rush it. Aim for targeted changes, not big, wet steps.
- Use a molded insert: A blue gun or a non-firing replica works well for extended set-and-seal time.
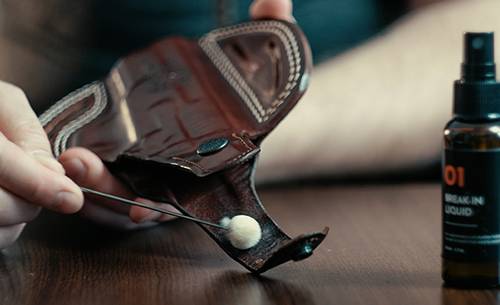
- Leather conditioner, sparingly: A pea-sized drop of a holster-safe conditioner on high-friction spots can help. Test on a hidden area first. Avoid the inside lining unless the maker says it is safe.
- Sight channel relief: If your front sight drags, ask the maker about gentle channel relief. Sometimes a brief press with a smooth tool along the channel helps.
I have seen folks try quick hacks. Most lead to soft leather or a loose mouth. Do less, check fit, and repeat. That wins every time.

What Not To Do
Some common tricks cause permanent damage. Skip these.
- Do not soak in water or oil. It weakens fibers and ruins shape.
- Do not use heat guns, ovens, or hair dryers. Heat cracks the finish and can warp the holster.
- Do not over-wrap the gun with thick materials. You will blow out retention and mouth tension.
- Do not add lotions, silicone sprays, or greases. They can soften the leather and trap grit.
- Do not force a stuck draw. Remove the holster from your belt, hold it steady, and ease the firearm out.
These mistakes are the fastest way to wreck a new holster. Keep it dry, cool, and controlled.
Care And Maintenance After Break-In
Once the fit is right, protect it. Good care keeps draw smooth and retention consistent.
- Wipe inside with a dry, clean cloth. Remove lint and dust. Do not soak the interior.
- Apply a light, holster-safe conditioner to the outside a few times a year. Avoid the mouth and inside unless approved by the maker.
- Keep shape with a quality belt and proper storage. Store upright, away from heat and sun.
- Spot-fix edges. If an edge feels sharp, gently burnish with a canvas cloth. Avoid sanding unless the maker recommends it.
In my carry rotation, the holsters that last are the ones I do not over-treat. Less is more.
Troubleshooting Fit Issues
Not all tight spots are the same. Here is how to read the signs and fix them.
- Too tight at the trigger guard: Use the thin wrap method and insert for 15 minutes. Then do 20 slow draws. Repeat once. Do not pry the guard area.
- Front sight drag: Press the sight channel from the outside with a smooth tool for a few seconds. Check fit. Repeat only if needed.
- Loose retention after break-in: Let the holster rest 24 hours empty. Leather can rebound slightly. If still loose, ask the maker about a retention screw or a professional re-mold.
- Ejection port snag: Micro-press the area from the outside. Keep pressure small and even. Avoid inside scraping.
If a problem persists, contact the maker. Many brands will adjust the holster or guide you through brand-specific steps.
Frequently Asked Questions
How long does it take to break in a leather holster?
Most holsters feel right after two to five short sessions. Plan on a few days of light practice draws and carry time.
Should I use water or oil to speed up the break-in?
No. Water and oil can stretch and weaken leather. They also risk warping and finish damage. Use the thin wrap method instead.
Can I use a hair dryer or heat to soften the holster?
Avoid heat. It can crack the finish, shrink, or deform the holster. Slow, dry, mechanical break-in works best.
Is it normal for the holster to squeak at first?
Yes, some squeak is normal. It fades as the leather conforms. A light outside conditioner, applied sparingly, can help reduce friction noises.
What if my holster never loosens up?
Check that the holster matches your exact firearm model. If it does, repeat the wrap method once more. If still too tight, consult the maker for adjustments or a replacement.
Will breaking in the holster scratch my gun?
Minor finish wear can happen with any holster. Keeping the interior clean and avoiding grit reduces wear. The wrap method also lowers early scuffing.
How tight should retention feel after break-in?
You should feel a positive hold and a clean release with a straight draw. The firearm should not fall out when held upside down with reasonable shake, unless the maker specifies otherwise.
Conclusion
A good leather holster starts snug, then becomes yours with patient, safe steps. Keep it dry, use gentle pressure, and test fit in short sessions. Avoid water, oil, and heat. If you do this, you will get a smooth draw and strong retention that lasts.
Set aside 15 minutes today to start the wrap-and-draw routine. Track your progress for three days. Then share your results and questions in the comments. Want more guides like this? Subscribe and explore our other holster care tips.
