Installing motion sensor stair lights can transform your home in many ways. You enjoy safer steps at night, save energy, and add a touch of style. If you are not sure how to install these lights, you are not alone.
Exclusive Deals
Limited-time Exclusive Deals. Check current discount on Amazon.
Check Price on Amazon As an Amazon Associate I earn from qualifying purchases.Many people worry about wiring, placement, and choosing the right products. This guide will show you every step, from picking the best motion sensor lights to making them work reliably on your stairs. You will learn practical tips, discover common mistakes, and get answers to questions most beginners ask.
By the end, you will feel ready to install motion sensor stair lights confidently—even if you have never done electrical work before.
Why Motion Sensor Stair Lights Make Sense
Many people think stair lights are just for looks, but motion sensor stair lights are much more useful. They help you see the steps clearly, especially at night or in dark places. This reduces the risk of falls and injuries—something important for all ages, but especially children and older adults.
Motion sensor lights turn on only when someone is near. This saves electricity compared to lights that stay on all night. Some models use LEDs, which are even more efficient. According to the US Department of Energy, LED lights use at least 75% less energy than traditional incandescent bulbs and last up to 25 times longer.
Exclusive Deals
Limited-time Exclusive Deals. Check current discount on Amazon.
Check Price on Amazon As an Amazon Associate I earn from qualifying purchases.Stair lights also make your home more welcoming. Imagine coming home late and your stairs light up automatically as you walk. This small change can make your house feel modern and safe.
Choosing The Right Motion Sensor Stair Lights
Selecting the right lights is the first step. There are many options, so you need to understand what really matters.
Types Of Motion Sensor Stair Lights
You will find three main types:
- Battery-powered lights: Easy to install. No wiring needed. Good for renters or people who want a quick upgrade.
- Plug-in lights: Plug into a nearby socket. Simple, but you need a power outlet close to your stairs.
- Hardwired lights: Connect directly to your home’s electrical system. More work to install, but they are reliable and look professional.
Each has pros and cons. Battery lights need regular battery changes. Plug-in and hardwired lights are more permanent, but require access to power.
Key Features To Look For
- Sensor range: Make sure the sensor can detect people from the right distance (usually 10–20 feet).
- Light brightness: Choose a brightness that shows each step clearly but does not blind you.
- Color temperature: Warm white (2700–3000K) is cozy; cool white (4000–6500K) is brighter and modern.
- Durability: Check if lights are rated for indoor/outdoor use.
- Adjustable settings: Some models let you change how long the light stays on or the sensitivity of the sensor.
- Style and size: Pick lights that match your stair design.
Comparing Popular Models
Here is a comparison of three common stair light types:
Exclusive Deals
Limited-time Exclusive Deals. Check current discount on Amazon.
Check Price on Amazon As an Amazon Associate I earn from qualifying purchases.| Model | Power Source | Sensor Range | Brightness | Color Options | Installation |
|---|---|---|---|---|---|
| Battery LED Strip | Battery | 12 ft | 80 lumens | Warm & Cool White | Peel & Stick |
| Plug-in Motion Step Light | Plug-in | 15 ft | 120 lumens | Cool White | Mount with Screws |
| Hardwired Stair Light | Hardwired | 18 ft | 150 lumens | Warm White | Professional Install |
Non-obvious tip: Many people forget to check the sensor angle. If your stairs have landings or turns, choose a light with a wide sensor angle (120–180°) so it covers all directions.
Planning The Installation
Before you buy or install anything, planning is key. A good plan avoids mistakes and saves time.
Measuring Your Stairs
Count the number of steps. Measure the width and length of each step. Decide if you want one light per step, or lights every few steps. For most homes, one light every 2–3 steps is enough.
Deciding Placement
Motion sensor stair lights work best when placed:
- On the side wall, close to each step
- Under the lip of each stair (for strip lights)
- On the riser (vertical part) of each step
The goal is to light the step without shining directly into your eyes. Avoid placing sensors where they can be blocked by furniture or railings.
Mapping Power Sources
Check where your power outlets are (for plug-in lights). For hardwired lights, note where the wiring will go. Battery-powered lights can go anywhere, but you need easy access for battery changes.
Sketching Your Plan
Draw a quick sketch of your stairs. Mark where each light and sensor will go. This helps you buy the right number of lights and plan your installation.
Practical tip: If you have pets, place lights higher on the wall so the sensors don’t trigger from small animals.
Tools And Materials Needed
You will need some basic tools and materials. The list depends on your light type.
- Battery-powered lights: Lights, adhesive strips, batteries
- Plug-in lights: Lights, screws/mounting brackets, screwdriver
- Hardwired lights: Lights, wire connectors, electrical tape, drill, voltage tester, wire stripper, mounting screws
For all types:
- Tape measure
- Pencil
- Level
- Safety gloves
- Step ladder
Non-obvious insight: Many beginners forget about a voltage tester when installing hardwired lights. This tool checks if the wires are safe to touch. Using it can prevent electrical shocks.
Step-by-step Installation Guide
Now you are ready to install. Follow these steps for a safe, successful setup.
Step 1: Prepare The Area
Clear the stairs of any objects. Clean the surfaces where you will mount the lights. Dust and dirt can make adhesives or screws less effective.
Step 2: Mark The Placement
Use your sketch to mark where each light will go. Make small pencil marks, and use the level to keep lights straight.
Step 3: Install The Lights
Battery-powered Lights
- Attach batteries to each unit.
- Peel off the adhesive backing.
- Stick the light in place, pressing firmly for 10–15 seconds.
- Test the sensor by walking near the stairs.
Plug-in Lights
- Mount the bracket or screws at your marked location.
- Plug the light into the nearest outlet.
- Attach the light to the bracket.
- Adjust the sensor direction if needed.
- Test the setup.
Hardwired Lights
Warning: If you are not comfortable with electricity, hire a professional. Always turn off power at the breaker before starting.
- Use the voltage tester to check that wires are not live.
- Drill holes for mounting if needed.
- Connect the wires from the light to the house wiring (matching colors: Black to black, white to white, green to ground).
- Secure with wire connectors and electrical tape.
- Mount the light with screws.
- Turn power back on and test.
Step 4: Adjust Sensor Settings
Most motion sensor stair lights have settings you can change:
- Sensitivity: How easily the light turns on
- Timer: How long the light stays on after motion
- Brightness: Some models allow brightness adjustment
Read the manual for your lights. Make adjustments until the lights work smoothly.
Step 5: Final Testing
Walk up and down the stairs several times. Check that the lights turn on at the right time and cover every step. If a light does not trigger, try adjusting the sensor angle or position.
Common mistake: Many people test lights only once. Do several tests at different times of day (daylight and night) to make sure sensors work reliably.
Troubleshooting And Maintenance
Problems can happen, even with good planning. Here’s how to fix common issues.
Sensor Does Not Trigger
- Check if the sensor is blocked.
- Make sure batteries or power are working.
- Adjust sensitivity settings.
- Try moving the light to a different spot.
Lights Flicker Or Stay On
- For plug-in or hardwired lights, check wiring connections.
- Reduce sensor sensitivity if lights trigger too easily.
- Replace batteries in battery-powered lights.
Uneven Lighting
- Add extra lights to dark spots.
- Change brightness settings if available.
Maintenance Tips
- Clean sensors and lights every few months.
- Replace batteries as soon as lights dim.
- For hardwired lights, check connections yearly.
Non-obvious tip: If you live in a humid climate, use lights rated for moisture. Humidity can cause sensors to fail or lights to rust.
Safety And Legal Considerations
Safety is important, especially when dealing with electricity.
- Always turn off power before wiring.
- Use a voltage tester to check wires.
- Wear safety gloves.
- Follow local electrical codes.
- For rental homes, check with your landlord before installing permanent fixtures.
Some cities have rules about how electrical work is done. If you are unsure, contact a licensed electrician or check official guidelines at National Electrical Code.
Creative Ways To Use Motion Sensor Stair Lights
Motion sensor stair lights are not just for stairs. Here are a few creative ideas:
- Outdoor steps: Light up your porch or garden stairs for safety.
- Hallways: Install lights in narrow hallways for easy night navigation.
- Bedroom entry: Place a light near your bedroom door for gentle nighttime lighting.
- Closet steps: If you have steps in a walk-in closet, add sensor lights.
Many people use color-changing lights for special occasions or to match their mood. Some smart models connect to your phone for custom settings.
Practical tip: For homes with children, use softer, warm lights to avoid harsh glare at night.

Comparing Installation Methods
Here is a quick comparison of installation difficulty and costs:
| Installation Type | Difficulty | Tools Needed | Average Cost | Time Required |
|---|---|---|---|---|
| Battery-powered | Easy | Adhesive, Batteries | $10–$30 per light | 10 min per light |
| Plug-in | Medium | Screwdriver, Mount | $15–$40 per light | 15 min per light |
| Hardwired | Hard | Drill, Wire Tools | $30–$80 per light | 30–60 min per light |
Battery-powered lights are popular for beginners. Hardwired lights are best for new homes or major renovations.
Hidden Challenges Beginners Miss
When installing motion sensor stair lights, some challenges are not obvious:
- Interference: Electronic devices like Wi-Fi routers can interfere with some sensors.
- False triggers: Pets, blowing curtains, or even insects can trigger sensors.
- Low-quality adhesives: Cheap adhesive strips often fail after a few weeks, especially on rough surfaces.
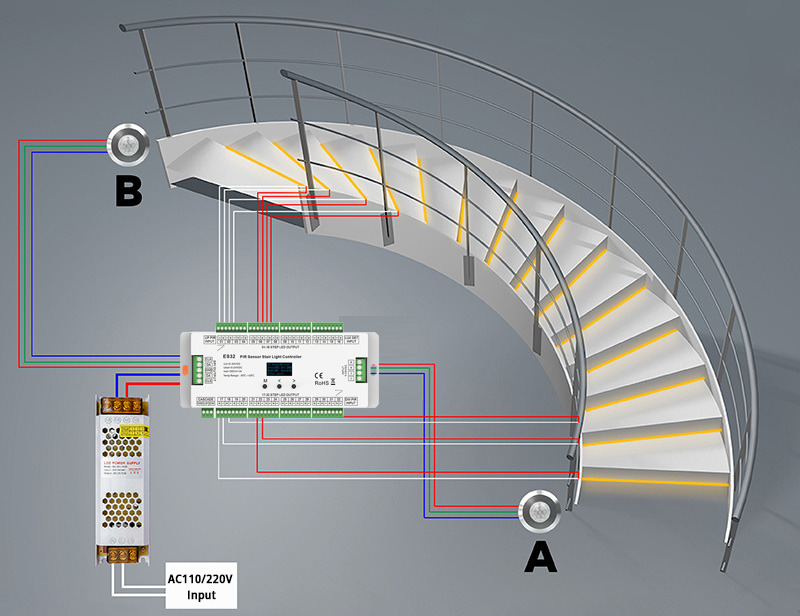
- Stair shape: Spiral or curved stairs need more careful placement and often require more lights.
To avoid these problems, buy quality products and test sensor coverage before final installation.
Real-life Example: Installing In A Family Home
Let’s look at an example. Sarah wanted to install motion sensor lights on her basement stairs for her children. She picked battery-powered LED strip lights with a wide sensor angle.
She measured her stairs (12 steps, each 3 feet wide). She decided to place one light every two steps, for a total of six lights. She cleaned the wall, marked each spot, and installed the lights with adhesive strips. She tested the sensors at night.
At first, the bottom two lights did not trigger. She moved the sensors slightly, and now all lights work perfectly.
Sarah changes batteries every six months. She says the project cost her $60 and took one hour. Her children are safer at night, and electricity bills are lower.
Non-obvious insight: Sarah found that placing sensors at knee height worked better than at foot level. This reduced false triggers from pets.
Frequently Asked Questions
How Long Do Motion Sensor Stair Lights Last?
Most LED stair lights last 20,000–50,000 hours, depending on the quality. Battery-powered lights need new batteries every few months. Hardwired lights can last for years with little maintenance.
Are Motion Sensor Stair Lights Safe For Children And Pets?
Yes, they are safe if installed correctly. Use lights with rounded edges and secure them firmly. Place sensors higher if you want to avoid triggers from pets.
Do I Need An Electrician For Installation?
For hardwired lights, hiring an electrician is safest unless you have experience. Battery-powered and plug-in lights can be installed by most homeowners.
Can I Use Motion Sensor Stair Lights Outdoors?
Some models are made for outdoor use. Look for weatherproof ratings (like IP65 or higher). Outdoor lights help prevent falls on porch or garden steps.
How Do I Prevent False Triggers?
Adjust the sensor sensitivity and placement. Avoid pointing sensors toward moving curtains or pets. Some lights have built-in filters to reduce false triggers.
Motion sensor stair lights are a practical upgrade for any home. When you plan well and follow these steps, you enjoy safer, more stylish stairs with less effort. Choose quality lights, take your time with installation, and check your work.
If you run into problems, use the troubleshooting tips here. With a little care, your stairs will light up automatically for years to come.