Resetting a smart doorbell might sound complicated, but it’s a useful skill for any homeowner or renter. Maybe you’re moving, dealing with technical glitches, or troubleshooting Wi-Fi problems. Sometimes, a reset is the only way to get your device working again.
Exclusive Deals
Limited-time Exclusive Deals. Check current discount on Amazon.
Check Price on Amazon As an Amazon Associate I earn from qualifying purchases.But smart doorbells come in many brands and models, each with its own reset steps. Understanding these differences and knowing exactly how to reset your device can save you time, money, and frustration.
Let’s walk through what “resetting” means, why it matters, and how to do it for the most popular smart doorbells. This guide covers common problems, provides step-by-step instructions, and shares some tips even experienced users miss. Whether you’re tech-savvy or just getting started, you’ll find clear answers here.
What Does “resetting” A Smart Doorbell Mean?
When you reset a smart doorbell, you’re restoring it to a previous state. There are two main types:
- Soft reset: This means rebooting or restarting the device without erasing settings or data. It often fixes minor bugs or connection issues.
- Factory reset: This wipes all settings, accounts, and data. The doorbell returns to its original, out-of-the-box state.
Why does this matter? If you’re selling your home or changing Wi-Fi networks, a factory reset is often required. For simple glitches, a soft reset is usually enough.
Exclusive Deals
Limited-time Exclusive Deals. Check current discount on Amazon.
Check Price on Amazon As an Amazon Associate I earn from qualifying purchases.Why Would You Need To Reset A Smart Doorbell?
Smart doorbells sometimes stop working as expected. Here are the most common reasons you might need to reset one:
- Device is unresponsive: The doorbell isn’t ringing or recording video.
- Wi-Fi connection issues: You changed your router, password, or network.
- App not syncing: Your phone app can’t connect to the doorbell.
- Ownership change: You’re selling your house or giving the device to someone else.
- Security concerns: You want to erase old data before recycling or donating the device.
- Firmware updates failed: The doorbell didn’t update correctly and now won’t work.
Resetting can fix these problems quickly, but remember: a factory reset erases everything. Make sure you have important videos or settings saved before you begin.
Soft Reset Vs Factory Reset: Key Differences
Understanding which reset to use is important. A soft reset is like restarting your phone—fast and safe. A factory reset is more drastic.
Here’s a comparison of the two:
| Type of Reset | What It Does | When to Use | Data Loss |
|---|---|---|---|
| Soft Reset | Restarts the device, keeps settings | Minor glitches, app won’t connect | No |
| Factory Reset | Wipes all data, restores to default | Ownership change, major errors | Yes |
Many people confuse the two, so always check your device’s manual or app before starting.
Exclusive Deals
Limited-time Exclusive Deals. Check current discount on Amazon.
Check Price on Amazon As an Amazon Associate I earn from qualifying purchases.Preparing To Reset Your Smart Doorbell
Before jumping into the reset process, take a few simple steps to avoid trouble:
- Backup important videos or settings: Once reset, you can’t get these back.
- Check the battery or power source: Make sure your doorbell is charged or connected to power. Interrupting a reset can cause problems.
- Read the manufacturer’s instructions: Each brand is different. Some require holding a button; others use the app.
- Disconnect from the app: Some apps need you to remove the device before a factory reset.
Missing these steps is a common mistake, especially for first-time users.
How To Reset The Most Popular Smart Doorbells
Each smart doorbell has its own reset process. Let’s look at the most widely used models, including Ring, Google Nest, Arlo, Eufy, and Wyze. If you have a less common brand, the same general steps will often apply.
Resetting A Ring Doorbell
Ring is one of the most popular smart doorbell brands. Here’s how to reset most Ring models:
Soft Reset For Ring
- Remove the faceplate if needed.
- Find the orange setup button (usually on the back or side).
- Press and release the button quickly.
- Wait for the light to flash and the device to restart.
This often fixes minor issues without erasing your settings.
Factory Reset For Ring
- Remove the doorbell from its mount.
- Press and hold the orange setup button for 15 seconds.
- Release the button.
- Wait for the front light to flash several times. This means the reset is starting.
- The device will restart and return to factory settings.
After a factory reset, you must set up your Ring doorbell from scratch. Don’t forget to remove it from your Ring app as well.
Special Note
Some older Ring models use a different process. Check the official Ring support page if you’re not sure.
Resetting A Google Nest Doorbell
Nest doorbells (wired and battery models) are also very popular.
Soft Reset For Nest
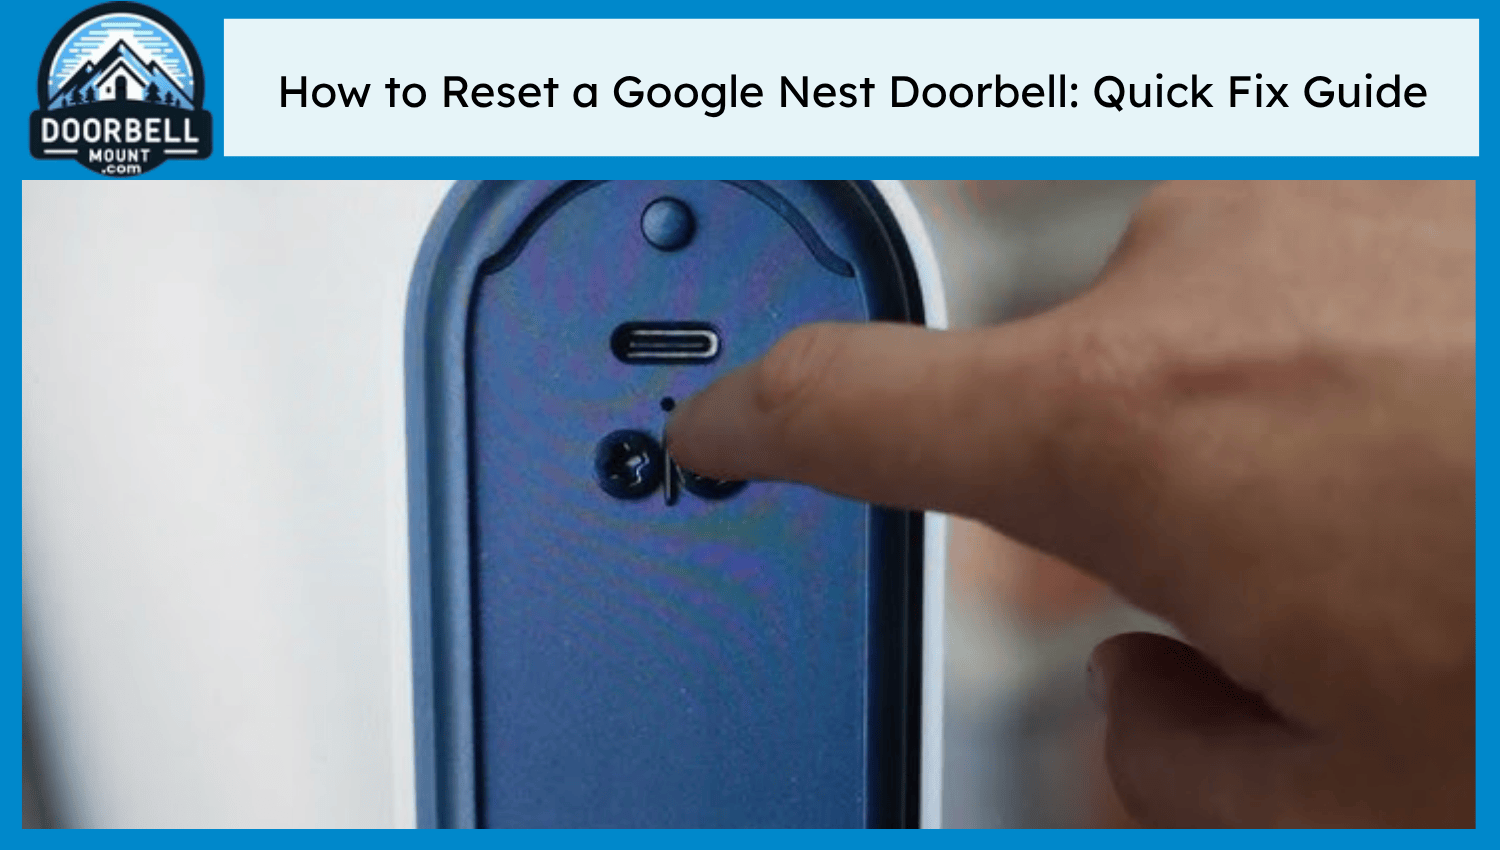
- For battery models: Press the reset pin (usually on the back) with a paperclip for 5 seconds.
- For wired models: Remove the device from power for a few minutes, then reconnect.
Factory Reset For Nest
- Remove the Nest Doorbell from its mount.
- Press and hold the reset button or pin for 10-15 seconds.
- Wait for the status light to turn yellow, then release.
- The doorbell will chime and reset.
After this, you must add the doorbell again to the Google Home app. All previous video history and settings are erased.
Resetting An Arlo Doorbell
Arlo doorbells (wired and wireless) have their own reset process.
- Remove the doorbell from its mounting bracket.
- Find the reset button (often on the back or bottom).
- Use a paperclip to press and hold for 10 seconds.
- The LED will blink white, then amber.
- When the LED turns solid amber, release the button.
Now the Arlo doorbell is reset and ready for new setup.
Resetting A Eufy Doorbell
Eufy doorbells, known for privacy, reset like this:
- Remove from the mount.
- Find the SYNC/RESET button (usually on the back).
- Press and hold for 10 seconds until you hear a beep or see a red LED.
- Release the button.
The doorbell will restart and all settings are erased.
Resetting A Wyze Doorbell
Wyze doorbells are affordable and popular for renters.
- Use a pin to press the reset button (located on the back or bottom).
- Hold for 5-10 seconds.
- The LED will flash, signaling the reset.
Re-add the device in the Wyze app after this step.
Brand Comparison: Reset Steps At A Glance
For a quick reference, here’s a table summarizing the reset steps for each brand:
| Brand | Soft Reset | Factory Reset | Special Tools Needed |
|---|---|---|---|
| Ring | Quick press setup button | Hold setup button 15 sec | None |
| Google Nest | Press reset pin 5 sec | Hold reset pin 10-15 sec | Paperclip |
| Arlo | Not always available | Hold reset button 10 sec | Paperclip |
| Eufy | Not always available | Hold SYNC/RESET 10 sec | None |
| Wyze | Not always available | Hold reset button 5-10 sec | Pin |
Not all brands have a soft reset option. When in doubt, start with a soft reset, then try factory reset if problems continue.

Common Problems And How To Fix Them
Resetting is not always the solution. Here are some problems that might need a reset, and what to check first:
Doorbell Offline Or Not Responding
- Check Wi-Fi signal: Weak signals are a leading cause of smart doorbell failures.
- Restart your router: Sometimes your network, not the doorbell, is the problem.
- Check power: A loose wire or dead battery can mimic bigger issues.
App Won’t Connect
- Update the app: Out-of-date apps may not sync with the doorbell.
- Reconnect to Wi-Fi: If you’ve changed your password, the device needs to be reconnected.
- Sign out and back in: Sometimes, simply logging out and back in fixes the connection.
Video Or Audio Not Working
- Check permissions: Make sure your phone allows the app to use the camera and microphone.
- Check internet speed: Smart doorbells need at least 2 Mbps upload speed for smooth video.
- Reboot the device: Try a soft reset before a factory reset.
Reset Didn’t Work
- Hold the reset button longer: Many users let go too early—count a full 10-15 seconds.
- Try a different power source: Some doorbells won’t reset if the battery is low or the wiring is bad.
- Contact support: There could be a hardware fault.
Many users forget to check their network or device power before resetting. Always start with these basics.
What To Do After Resetting Your Smart Doorbell
After a reset, your doorbell is like new. Here’s how to get it working again:
- Reconnect to Wi-Fi: Use your app to add the doorbell to your home network.
- Sign in to your account: Enter your login details in the app.
- Update firmware: Check for updates—older software can cause problems.
- Customize settings: Adjust motion zones, notification preferences, and video quality.
- Test the doorbell: Ring the bell and check the app for live video and alerts.
If you’re moving or selling, make sure to remove your account from the device so the new owner can set it up cleanly.
Privacy And Security: What You Need To Know
Resetting your smart doorbell is not just about fixing problems. It’s also about protecting your privacy. Smart doorbells can record video, audio, and collect personal data. If you sell your house or give away your device, a factory reset is essential.
Otherwise, someone else could access your old videos or settings.
Some brands store video in the cloud, not just on the device. Make sure you delete your account or unlink the device online. For extra security, change your Wi-Fi password after removing a smart doorbell.
Two Insights Most People Miss
Even experienced users can overlook these points:
- Cloud accounts vs device resets: Resetting your doorbell does not always remove it from your online account. You may need to delete the device in the app or on the company’s website. If you skip this, you might not be able to add the device again, or the new owner could have problems.
- Firmware bugs: Sometimes, a doorbell appears to be “bricked” after a failed update. In these cases, a reset might not work until you manually update the firmware using a computer or USB cable (if your device allows). Always check the manufacturer’s instructions for special recovery steps.
Tips For A Smoother Reset Experience
- Write down your Wi-Fi password before starting. You’ll need it again.
- Have your phone or tablet nearby with the latest app version installed.
- Don’t rush—hold reset buttons for the full time, even if the light flashes early.
- Update firmware before resetting if possible. This sometimes solves issues without a reset.
- Test your doorbell after setup to confirm everything works—press the button, check notifications, and try two-way audio.
Smart Doorbell Reset: Troubleshooting Checklist
If things aren’t working after a reset, go through this checklist:
- Is the power or battery charged?
- Did you hold the reset button for the required time?
- Did you remove the device from your app/account?
- Is your Wi-Fi working and password correct?
- Are you using the latest app version?
- Is the firmware updated?
- Did you check for manufacturer-specific steps online?
Being systematic prevents frustration and repeated resets.
When To Contact Support
If you’ve tried all steps and your doorbell still won’t work, it might be time to contact customer support. Signs you need help:
- The device won’t power on after reset.
- The LED lights don’t flash as expected.
- The doorbell can’t be added back to your app after multiple attempts.
- You see error messages you don’t understand.
Most brands have live chat, email, or phone support. Have your model number, purchase details, and a summary of what you’ve tried ready.
Firmware Updates: Don’t Forget This Step
Many smart doorbell issues are caused by outdated software. After a reset, always check for firmware updates. These can fix bugs, improve performance, and add new features. Firmware updates usually appear in the doorbell’s app under “Device Settings” or “About.
”
Some brands push updates automatically, but others require manual approval. If you skip this step, you may find the same problems returning even after a reset.
Data Storage: Local Vs Cloud
Where your doorbell stores data affects what happens during a reset.
- Local storage: Some devices (like Eufy or Wyze) store video on a microSD card. Remove and back up your card before resetting.
- Cloud storage: Brands like Ring and Nest store video online. Resetting the device won’t erase cloud videos unless you delete them in your account.
Here’s a quick comparison:
| Brand | Local Storage | Cloud Storage | What Happens on Reset? |
|---|---|---|---|
| Ring | No | Yes | Device reset, cloud data stays unless deleted |
| Nest | No | Yes | Device reset, cloud data stays unless deleted |
| Arlo | Some models | Yes | Device reset, local card must be wiped separately |
| Eufy | Yes | Optional | Device reset, remove card to keep data |
| Wyze | Yes | Optional | Device reset, remove card to keep data |
If you care about old video clips, always check both local and cloud storage before a reset.
Frequently Asked Questions
How Do I Know If My Smart Doorbell Reset Worked?
You’ll usually see the device’s light flash or hear a chime. The doorbell will disappear from your app and act like a brand-new device. If you can add it back in the app, the reset was successful.
Can I Reset My Smart Doorbell Without Removing It From The Wall?
For most models, yes. Many reset buttons are accessible without full removal. However, some older or wired models may need to be taken off the mount to reach the reset button.
Will Resetting My Smart Doorbell Erase All My Videos?
A factory reset erases videos stored on the device, but not always those in the cloud. Check your app or online account to delete cloud videos if needed.
What Should I Do If My Doorbell Won’t Reconnect After A Reset?
Double-check your Wi-Fi password, update the app, and restart your phone. If problems continue, try resetting the doorbell again and make sure you removed it from your account.
Is It Safe To Buy A Used Smart Doorbell?
Yes, but ask the seller to factory reset it and remove it from their account. Otherwise, you may not be able to set it up. Always check for manufacturer guidance on transferring ownership. For more details, see Consumer Reports.
Resetting a smart doorbell is a powerful tool when things go wrong or ownership changes. With the right steps, you’ll keep your device secure, functional, and ready for whatever comes next. Always check instructions for your specific model, and don’t forget to protect your data and privacy along the way.